Art GuidelinesBill2022-06-20T22:24:39+00:00
File Preparation Guidelines
Please review each of the following print ready criteria to help ensure your print job stays on schedule.
File Type
In order of preference we accept PDF, EPS, TIF, JPG and PSD files. Embed fonts or convert to outlines before saving. We can accept native files from Adobe CS6 or MS Office software, but prefer you export it to a PDF to ensure the integrity of your layout. We recommend using PDF/X-3 format when possible. If unable to make a PDF, be sure to “package” your file for an outside printer with all fonts and linked images.
Resolution
100-200 DPI is best for most large-format applications. Larger resolutions just make the file larger and take more processing time without adding visual quality. Submitting files with a lower resolution than 100 DPI can make the image look pixilated and blurry, especially if the file needs to be enlarged. Files that need to be enlarged more than 200% should be at least twice the resolution (200 DPI +) to help ensure the quality of the final print.
Use this chart as a guide for art at 100% final size:
Viewing Distance
|
3 ft
|
5 ft
|
10 ft
|
50 ft
|
DPI
|
200
|
150
|
72
|
10
|
Color
Most files can be prepared in the RGB color space. This is the color space of most digital camera files, renderings, CAD output and MS Office files. When possible, save the file with the appropriate color profile, Adobe RGB (1998) for RGB files or GraCOL2013 for CMYK files. Files submitted using Spot/PMS colors or that don’t have a color profile embedded will be converted in the RIP, which will attempt to match the intended color as close as possible, but could cause a slight color shift in the finished product.
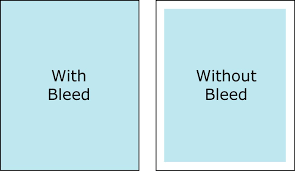
File Size (Bleed)
Most projects can be built to the final trim size with no bleed. If you include bleeds in your layout, your files should be 0.25″ larger than the product size that you are purchasing. (i.e.24″x 60″ banner = 24.25″ x 60.25″ graphic file).
Bleeds
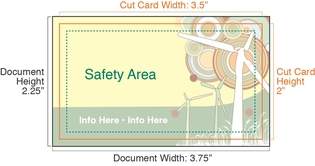
Safety Zone
Do not place any critical images or text beyond the safety zone, which is at least 1/8″ from the final trim size, in order to avoid it getting cut off when the finished piece is trimmed.
Borders
If your graphic files contain a border the border must have a minimum 1/8″ (0.125″) from all surrounding edges. If you leave less than 1/8″ (0.125″), your finished product may result in unequal borders from top to bottom and from side to side. This is due to the final cutting process in which some “draw” or “slippage” might occur. Ideally, you want to create the border with 1/4″ (0.25″) from all surrounding edges. We don’t recommend black or dark borders with anything direct printed on the flatbed printer because of ink flaking on the edges after trimming.
Typographical / Grammar Errors
Make sure you have proofread your artwork to ensure the spelling and grammar is correct. We will not be held responsible for typographical or grammar errors.
Pre-flight/File Preparation
We pre-flight all files before submitting them to production for any technical issues. If your submission isn’t prepared as stated above and it requires more than 10 minutes of processing time you may be subject to a file prep charge at the rate of $90/hr. at our discretion.
If you require a hard-copy or electronic proof, your project will not go into production until final art is approved and will affect your turnaround time accordingly.